


Sophie’s Pinhole Testing


Evaluation Technical Camera T.H
Technical Camera
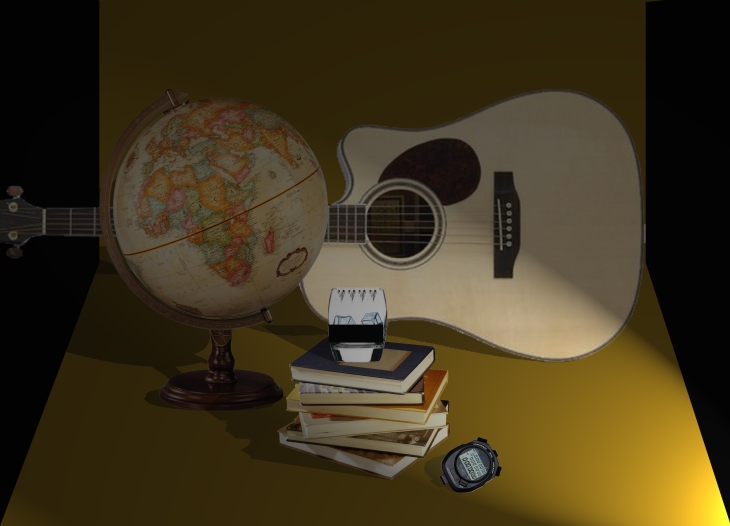
Here is my final Technical Shot. I have used the same set for both tech and Pin hole as I thought it would be more time effective. I have also used the same lighting on both, as I have said above. Before shooting my finals on this camera I did some test shots with paper as I was not sure how the camera worked as this was a new camera that I haven’t worked with before. I find this practice helped me when I came to shoot as I knew how it worked for example how to get the framing correct ect. For my final image I did not have to add stops from the bellows to increase the time as they where stretched enough to yet the right focal length. I did research on bellows calculation and tried some example just so I knew how to calculate it. I wanted to create a distorted image as I feel this is what most people’s view of the world is, for example oil not running out. I did this by bending out the back plate of the camera so the image got stretched out to the one side, creating the look and feel I wanted. I am pleased with my final image as I think it is effective and shows the message I wanted. Specially I feel I exposed it right when shooting and printing. I also I feel I have used the camera technically well for example working out the bellows. I have applied my skills from my other photography experience to a different situation.
Placing of objects
The placing of the objects is important in Vanitas. I have placed the guitar at the back as it is not very important compared to the other objects. I have placed the globe at the left front, to show it is most important. I have also placed it to the left so it is opposite the books and glass of oil and ice. This is to show that the world is over powering the resources (using to much). This idea comes from my I research . I have placed chick skull’s on the glass to show death and overproduction as we kill loads of animal unnecessarily for meat that is offend wasted . Finally I have placed a stopwatch in the front with the globe to show not just time running out for the world but also that we can have control of it, as you can stop a stopwatch or keep it running.
Printing Image
To print my Neg I simply placed it on top of my paper and exposed it to the light. I did test strip to see how long I would need. I also added a grade 3 filter to add more contrast to my image, I exposed this for 40sec.
Object Meaning
The skull – which is the universal symbol of death.
The books- represent the range of human knowledge, while the musical instruments suggest the pleasures of the senses. Both are seen as luxuries and indulgences of this life, which a lot of people today like to do.
The Stopwatch- Time running out
Globe- Represent the World
Camera Settings (Pin Hole)
Shutter ½ sec 1/5 sec
F 11
Tripod – Used
Evaluation Pin Hole T.H
Here is my final Pin Hole Shot. I have used the same set for both tech and Pin hole as I thought it would be more time effective. I have also used the same lighting on both. I have used one tungsten (left hand side) and a theatre light (right hand side) I previously had a cool light on the guitar but when trying this lighting again it did not have the same effect as it did before. The cool light made a box shape reflexion onto my guitar which I could not get rid of without changing my lighting, so I decide to change the light and not the placing of it. I used a theatre light instead, this was much easier to use and control. This solved my problem. I am pleased with my final image as I think it is effective because communicates the message I wanted. I also feel I have built the camera successfully and am proud to say I made it myself. I did find it hard to get the exposure right but I feel I did an effective job and overall am pleased.
Placing of objects
The placing of the objects is important in Vanitas. I have placed the guitar at the back as it is not very impotent compared to the other objects. I have placed the globe at the left front, this is to show it is most impotent. I have also placed it to the left so it is positioned opposite the books and glass of oil and ice this is to show that the world is over powering the resources (using to much). This idea comes from my researched into it. I have placed chick skull’s on the glass to show death and overproduction as we kill loads of animal unnecessarily for meat that is offend wasted . Finally I have placed a stopwatch in the front with the globe to show not just time running out for the world but also that we can have control of it, as you can stop a stopwatch or keep it running.
Printing Image
To print my pin hole I had to make it into a positive, I did this by placing the image on top of a blank piece of paper so the light can project the image onto the paper to made the positive out of the neg. I exposed this for 20sec.
Object Meaning
The skull – which is the universal symbol of death.
The books- represent the range of human knowledge, while the musical instruments suggest the pleasures of the senses. Both are seen as luxuries and indulgences of this life. Which a lot of people today like to do.
The Stopwatch- Time running out
Globe- Represent the World
Camera Settings (Pin Hole)
Camera set 70cm back from set itself
Shutter 15Min
F8/11
Tripod – Used
Making My Pinhole Camera Part 3
I then decided to make a paper holder to hold my paper in place to do this I got some foam board measured it up so it would fit in my pinhole camera and cut out 2 pieces the same size. I then took one of them and cut a window out of it making sure the boarder was the same all around the edges. I then got some spare pieces of foam board and glued them to the back of the window and then onto the other piece that hadn’t been cut to create my paper holder. I then slid this into my pinhole camera and taped it so it could not move.


Making My Pinhole Camera Part 2
To do the lid of my pinhole camera I measured up and cut out a piece of foam board and scored down the board about a quarter of the way on one side. I then bent it to make a hinge so I could easily put paper into my pinhole camera. I then got another bit of foam board and did the same and attached this to the other hinge so this would make my pinhole more secure and not let light into it. Once I had done that I cut another small piece of foam board and glued that on the inside of the hinges to create a light block. I also then added sponges to either side to make sure my pinhole was light tight.


